Guide
Carosia World Map: Regions, Level Ranges and Routes
Every region on the Continent of Carosia, level ranges, teleport points, and the exploration order that wastes the least time.
The Continent of Carosia is not one open map with a level label pinned to each zone. It is a set of bands that open with the main story, and the band you can reach is often not the band you can hold. Your player level, not a region number, decides whether a new catch will listen to you, so the useful question is not "what level is this zone" but "what does this zone give my current loop".
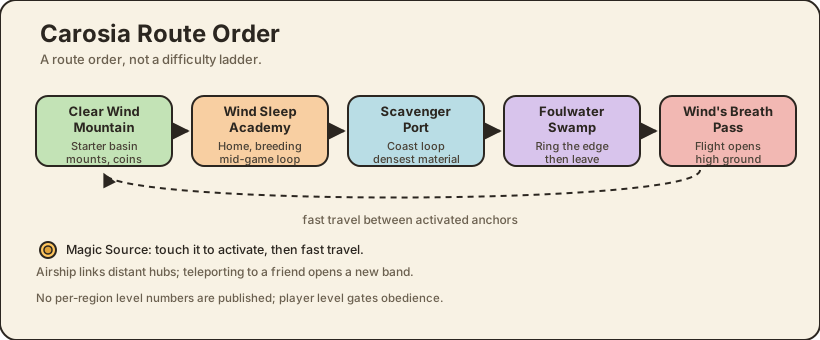
How the continent is organised
Two tracks run in parallel. Story chapters open the map and the systems attached to it; player level controls obedience, and a Jini more than 10 levels above your Roco will refuse orders in battle (CN build, Season 3). That is why a region can feel closed at level 20 and trivial at level 40 without any wall moving.
CN posts do not publish a per-region level table. Any page that tells you "zone X is level 25 to 35" is estimating, and the estimate breaks as soon as a season shifts the spawn pool. What the sources do support is the band structure below: where each group of sub-areas sits, what opens it, and what it is worth farming.
| Band | Main areas | Opened by | Why go |
|---|---|---|---|
| Starter basin | Clear Wind Mountain, Shopping Street West, Coco Fruit Plaza, King's Castle, Peter Avenue | Tutorial and early story | First mounts, coin drawers, starter catches |
| Wind Sleep Province | Wind Sleep Sanctuary, Magic Home, Wind Sleep Academy outpost, Moonbridge, Stormhound Grassland, Lingfeng Farm, Obenstein Lake, Crescent Town, Moonshadow Fishing Ground | Main story, chapters 2 to 3 | Home, Academy, breeding, mid-game materials |
| High ground | Starfrost Cliff, Mist Peak, Wind's Breath Pass, Dawn Mountain, Unicorn Territory, Royal Guesthouse, Frost Village | Story progress plus flight | Vargyr, Gentleman Chicken, higher-level spawns |
| Coast and industry | Scavenger Port, Believers' Village, Spinning Tavern, Peter Alchemy Yard, Shipwreck Vortex | Story progress plus swimming | Dense material loops, ancient coins, dungeon entrance |
| Badlands and academy | Foulwater Swamp, Rocolian Academy outpost | Side and academy content | Ring-shaped resource run, class and trial content |
Treat that table as a route order, not a difficulty ladder. The story walks you through the first two bands; the rest are optional depth, and you can enter them early as long as you accept that the catches will not obey yet.
Magic Sources and the travel loop
Magic Sources are the teleport anchors. Touch one to activate it, then open the map to fast travel between activated anchors. An airship also links distant hubs and is faster than running a route you have already unlocked (CN build, Season 3; single source). You can teleport to a friend as well, which is the cheapest way to open a new band: their anchors become your destination even if you have never walked the road (CN build, Season 3; single source).
Activate anchors as you pass them, never as a detour. The map rewards density: a zone with three anchors can be looped in minutes, while a zone with one anchor costs you the walk back every time. Several anchors also sit next to a spawn you will want later:
- Clear Wind Mountain Magic Source — the starter anchor. Winter Feather Bird and Duckiji are both caught around it, which makes it your first flight and water pair.
- Starfrost Cliff anchor — reachable only with flight, and the documented Vargyr ledge sits above it.
- Sea Spray Base anchor — a coastal anchor above the water where Emerald Jellyfish appears at night.
- Huitian Hillside anchor — grass near the anchor holds Granny Seed once you are level 30 or above (CN build, Season 3).
- Shipwreck Vortex — a dungeon mouth rather than a farming zone, with a second Vargyr spawn at the entrance.
Region-locked Jinies and resources
Most of the map is generic spawn ground. The exceptions are worth a dedicated trip: one place, one schedule, or one traversal skill.
| Target | Where | Gate |
|---|---|---|
| Duckiji | Clear Wind Mountain Magic Source | Main story; early water travel |
| Winter Feather Bird and Mist Bird | Clear Wind Mountain, Mist Peak | Early flight; Mist Bird needs evolution |
| Sonic Hound | Shopping Street West slope, near the alchemy cauldron | Level 26 to ride (CN build, Season 3; single source) |
| Vargyr | Starfrost Cliff anchor, Shipwreck Vortex entrance | Flight to the ledge; 05:00 daily refresh (CN build, Season 3; single source) |
| Emerald Jellyfish | Sea below Sea Spray Base | Night only, 18:00 to 06:00 (CN build, Season 3; single source) |
| Granny Seed | Huitian Hillside grass | Level 30 or above (CN build, Season 3) |
| Verdant Lady | Hidden Mudflat | After level 30 (CN build, Season 3) |
| Gentleman Chicken | Dawn Mountain | Lightcatch Ball catch |
Materials follow the same logic. Flowers and ore respawn twice a day, so a morning lap and an evening lap beat one long session (CN build, Season 3; single source). Region-specific flowers and ore are also what you turn into element balls, so a farming route is really a capture-budget route.
Time, weather and hidden spots
Three kinds of gating are documented, and only one of them is a wall.
- Time of day. Emerald Jellyfish spawns between 18:00 and 06:00 (CN build, Season 3; single source). Vargyr refreshes at 05:00 daily, so the same ledge is empty most of the day (CN build, Season 3; single source). Night also changes behaviour: some Jinies lead sleeping packs around after dark, which is a scene rather than a spawn rule.
- Weather. Rain is a real field state, not a visual filter. One documented case is an Electric Giraffe-type Jini shocking itself in rain and ending up stunned (single source, English fan guide). No source describes a zone that opens only in weather, so do not wait for rain to enter anywhere.
- Hidden spots. Jini vision reveals chests and special points, and observation points accept any Jini you throw at them (CN build, Season 3). Sparkle points and shelter stars do not respawn, while treasure and ordinary gathering nodes do (single source). Shelter fruit placed in a friend's world is also how you spawn starters you did not pick.
If a spot is not on your map, it is usually a vision problem rather than a missing region. Put a detection Jini in the party before you decide the area is empty.
The order that saves hours
Push story until the Magic Handbook and Home are open, then stop free-roaming. From that point the map is a set of loops, and each loop should end where the next one starts.
- Clean the starter basin. Clear Wind Mountain, Shopping Street West, Coco Fruit Plaza and King's Castle hold your first mounts and the free coin drawers. Do this once, on foot.
- Run the central loop. Wind Sleep Academy outpost, Magic Home, Shopping Street West, Moonbridge, Stormhound Grassland, Lingfeng Farm, East Factory, West Factory, Obenstein Lake, Crescent Town, Moonshadow Fishing Ground.
- Run the coast loop. Scavenger Port, Believers' Village, Spinning Tavern, the coastal strip below the port, then the mine under Peter Alchemy Yard. This is the densest material run on the early map.
- Ring the swamp. Foulwater Swamp is a circle, not a corridor; walk the edge and leave.
- Climb once you can fly. Wind's Breath Pass, Unicorn Territory, the river below the pass, Royal Guesthouse, Drake Ford Manor, Sweetwater Town, Frost Village. Add Starfrost Cliff and Mist Peak when you want Vargyr or high-ground spawns.
The full set covers roughly 80% of the resource layout, and a practised mobile lap takes about an hour (CN build, Season 3; single source). Do not run it on your boss team. A movement Jini plus a stack of Love Share turns the same nodes into several times the yield, which is the difference between a route that pays for itself and one that does not. The mounts guide explains the team shape.
If you are still below level 30, fix your story pace before you optimise routes; the beginner guide covers the 10-level obedience rule. If travel budget is the bottleneck, the currency guide explains which purchases shorten the loop.